

Virtual Firewall: Managing Port Forwarding, Outgoing Addresses and VPN Users from the Panel
You can manage the port forwarding rules, outgoing addresses and VPN users of your Virtual Firewall service from the client panel. Without opening a support ticket you can add a rule, remove a rule you added and undo your last change.
How to open the page
In the client panel, click Services -> Firewall in the left menu. The link appears only in accounts with an active Virtual Firewall service. When the page opens, the rules are read from your firewall; this may take a few seconds.
First visit
The first time you open the page, you see a short notice about firewall management: an opened port may expose your server to the internet, a wrong rule may interrupt access to your services, and the changes you make from the panel are your responsibility. After you confirm the notice, management opens; the confirmation is asked once for your account. If you are not familiar with firewall management, you can leave the change to us with a support ticket.
What the page shows
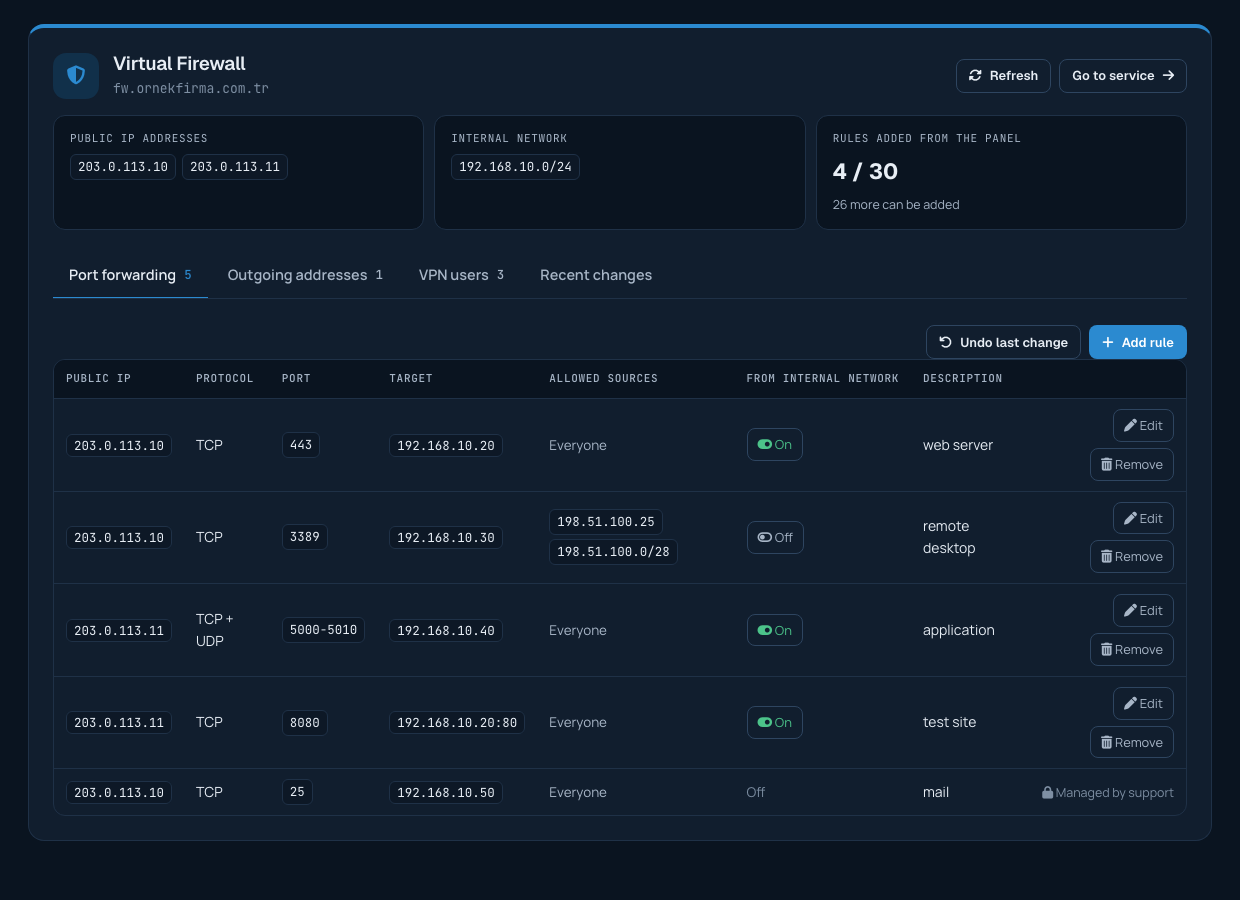
At the top you see your public IP addresses, your internal network and your rule count. Below it, tabs let you switch between sections: Port forwarding, Outgoing addresses, VPN users and Recent changes. Each tab shows the number of entries in that section.
- Public IP addresses: the internet-facing IP addresses assigned to your firewall.
- Internal network: the local network your servers are in (example: 192.168.13.0/24).
- Rules added from the panel: how many rules you have added and the maximum you can add.
- Port forwarding rules: all forwarding rules on your firewall.
- Outgoing addresses (source NAT): the IP address your internal servers use to reach the internet. You can add and remove rules here.
- VPN users (OpenVPN): the users that can connect to your internal network over VPN, their status and whether they are connected right now.
- Recent changes: the changes made from the panel, with their dates.
What is port forwarding?
A connection arriving at a port of your public IP address is passed on to a server in your internal network. For example, you can forward requests arriving at port 443 of your public IP to your web server at 192.168.13.10 to make your site reachable from the internet.
Adding a rule
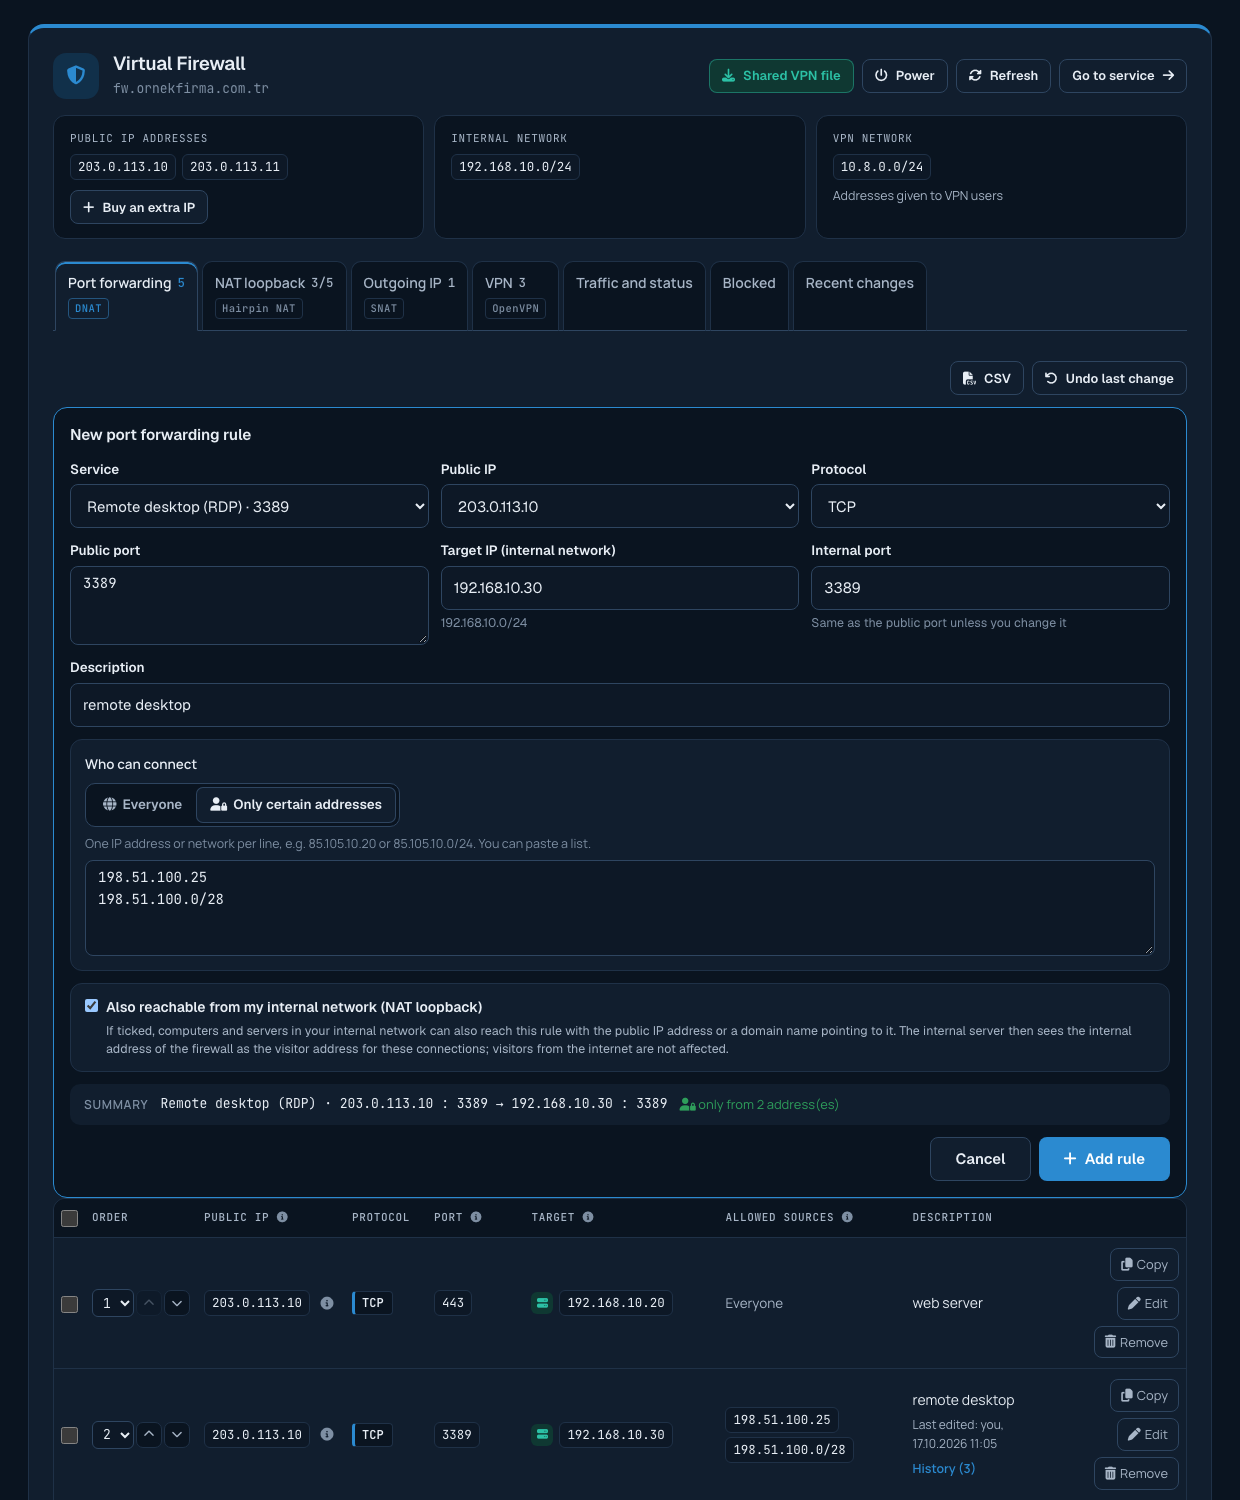
Click Add rule and fill in the fields:
- Public IP: the IP address the connection arrives at. Chosen from the list.
- Protocol: TCP, UDP or both.
- Public port: a single port (443), several ports (80, 443) or a port range (5000-5010).
- Target IP (internal network): the internal address of the server that receives the connection.
- Target port: enter it if the port on the server differs from the public port (example: public port 8443, target port 443). If left empty, the same port is used. A different target port can only be used with a single public port.
- Description: a short note to recognise the rule later (example: web server).
- Allowed source IP addresses: if the port should be reachable only from certain addresses, enter them separated by commas (example: 85.105.10.20, 85.105.10.0/24). If left empty, the port is open to everyone.
When you click Add rule, the rule is applied to your firewall and verified. This may take up to half a minute; the rule then appears in the list.
Editing a rule
You can change a rule you added from the panel without deleting it. Click Edit on the rule's row and the form opens with the rule's current values; for example, you can add a new IP address to the allowed sources or change the port or target. When you click Save changes, the rule is updated in place on your firewall and verified; if it cannot be verified, the rule returns to how it was. An edit is not undone with "Undo last change"; you can edit the rule again if needed.
Access from your internal network (NAT loopback)
When a computer or server in your internal network connects to the public IP address of a port forwarding rule (or to a domain name pointing to it), the connection normally fails: the request reaches the internal server, but the reply goes straight back to the client without passing through the firewall, so the connection breaks. For example, a website running on a server behind the firewall does not open by its domain name from another server in the same network.
If the Also reachable from my internal network (NAT loopback) box is ticked when you add a rule, this does not happen; the box is ticked by default. You can also turn the option on or off for each rule in the From internal network column of the rule list. Good to know:
- For these connections from your internal network, the internal server sees the internal address of the firewall as the visitor address. Visitors from the internet are not affected.
- If the option is on for a rule limited to allowed source addresses, machines in your internal network can also reach that rule.
- The option only affects traffic from your internal network; it does not change access from the internet.
Allowed sources and responsibility
A rule added without allowed sources can be reached by anyone on the internet; in that case the panel asks you to confirm. You decide which port is opened to whom, and the security of an opened port is your responsibility. For ports such as remote desktop (3389), SSH (22) and databases (1433, 3306, 5432) we recommend limiting access to the IP addresses you use instead of opening them to everyone.
Adding an outgoing address (source NAT) rule
Servers in your internal network reach the internet with your default public IP address. If you have several public IP addresses, you can choose which one a server uses; for example, you can have your mail server go out with its own IP address.
Click Add outgoing rule, enter the internal IP address of your server and choose the outgoing address from the list. The list contains only the public IP addresses assigned to your firewall. An internal address can have a single outgoing rule; to change it, remove the old rule first.

Adding a VPN user
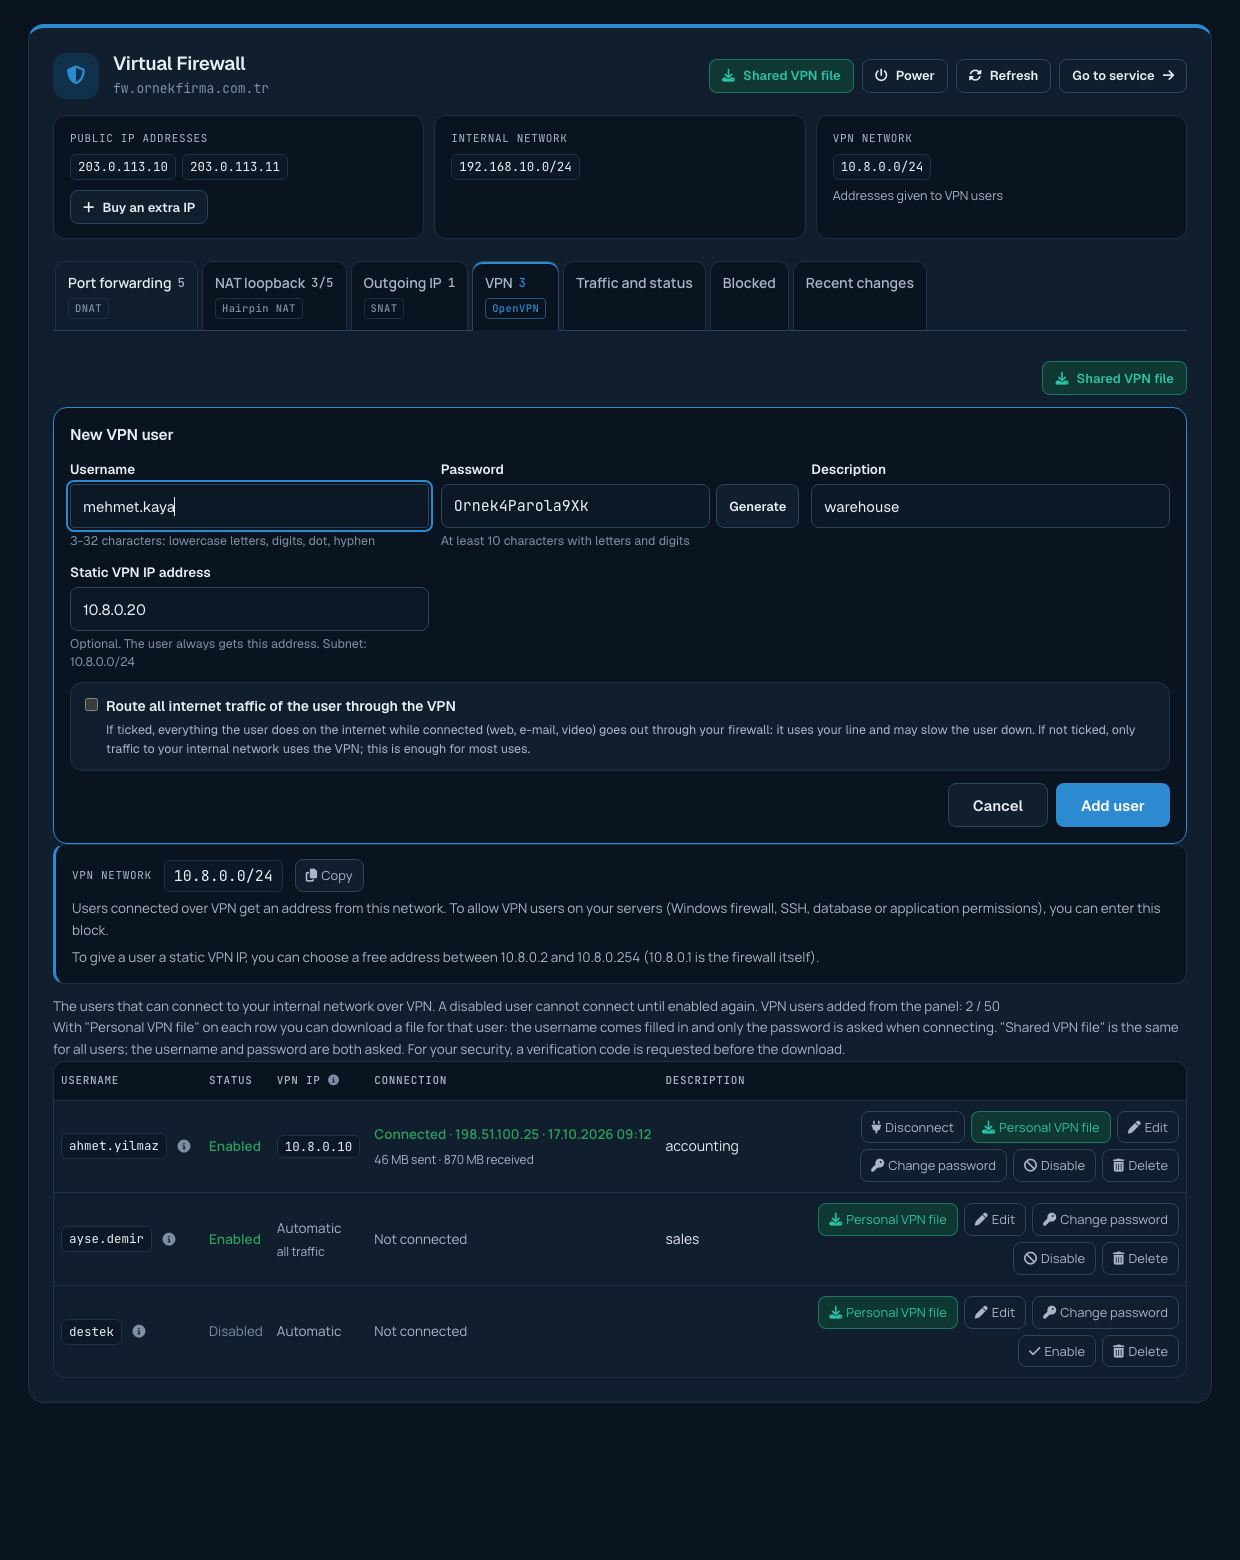
Click Add user and fill in the fields:
- Username: 3-32 characters; lowercase letters, digits, dots, hyphens and underscores can be used.
- Password: at least 10 characters with letters and digits. You can create a strong password with the Generate button.
- Static VPN IP address: optional. If entered, the user gets the same address on every connection; the address must be in your VPN subnet and must not be assigned to another user. If left empty, the address is assigned automatically.
- Route all internet traffic through the VPN: if ticked, all internet traffic of the user goes out through the VPN. Otherwise only traffic to your internal network uses the VPN.
When the user is added, the username and password are shown once. The password is not stored in our system and is not shown again, so please save it.
VPN configuration file
With Download configuration file in the VPN section you can download the file (.ovpn) to import into your OpenVPN client. The file is prepared at that moment from the current settings of your firewall and is the same for all VPN users; the username and password are asked when connecting. For your security, a verification code sent to your phone (or to your e-mail address if there is no phone) is requested before the download; the verification is valid for one hour in your session.
You can import the file into a client such as OpenVPN Connect (Windows, macOS, iOS, Android) or OpenVPN GUI and connect with your username and password.
Editing, disabling and deleting a VPN user
- Edit: changes the static IP address, the traffic option and the description. The change takes effect the next time the user connects.
- Change password: sets a new password for the user. Use it also for a user who has forgotten the password.
- Disable / Enable: a disabled user cannot connect until enabled again. Useful for people who have left or whose access is paused.
- Delete: removes the user permanently.
VPN users marked Managed by support were defined by our team; you can open a support ticket to change them.
Removing a rule
Click Remove on the rule's row and confirm. Once removed, connections arriving at that port are no longer forwarded.
Rules marked Managed by support were defined by our team and cannot be removed from the panel. You can open a support ticket to change them.
Undoing the last change
Undo last change reverses the last rule change you made from the panel (VPN user actions are not undone): if it was adding a rule, that rule is removed; if it was removing a rule, the same rule is added again.

How changes are protected
Every change is verified after it is applied. A change that cannot be verified does not become permanent; your firewall returns to its previous state automatically. All actions are logged.
Rules that cannot be added
- A public IP address that is not assigned to your firewall cannot be used.
- The target IP cannot be outside your internal network.
- A port already used by another rule on the same public IP cannot be forwarded again. You can remove the old rule first or choose a different port.
- Ports reserved for managing the firewall itself cannot be forwarded.
- When the rule limit is reached, no new rule can be added. You can open a support ticket to raise the limit.
User permissions
If you have added users to your account, viewing the rules requires the "view services" permission and changing them requires "manage services". The account owner can grant permissions under Account -> Users.
What cannot be done from the panel
For other firewall settings you can open a support ticket.
Detailed articles
Each topic is also explained separately in the knowledge base:
- Virtual Firewall: Adding and Editing Port Forwarding Rules
- Virtual Firewall: Opening a Port Only to Certain IP Addresses
- Virtual Firewall: Choosing the Outgoing IP Address of a Server
- Virtual Firewall: Access from Your Internal Network (NAT Loopback)
- Virtual Firewall: Adding VPN Users, Passwords and Static IPs
- Virtual Firewall: Connecting to the VPN (Windows, macOS, iOS, Android, Linux)
- Virtual Firewall: Change Verification, Undo and Change History