

Virtual Firewall
Managing Port Forwarding, Outgoing Addresses and VPN Users from the Panel
You can manage your Virtual Firewall service yourself from the client area: port forwarding rules, outgoing addresses, NAT loopback, VPN users, IP blocking, traffic monitoring and restarts. Without opening a support ticket you can add, edit and remove rules and undo your last change.
How do I get to the page?
In the client area, click Services -> Firewall in the left menu. The link is only shown on accounts with a Virtual Firewall service. You can also go straight to a firewall's page by clicking its name in your services list or on your service's page.
If you have more than one firewall, they are first shown in a list; you can search by name, domain or IP address and choose the one you want to manage. While on a firewall's page, use the Switch firewall menu in the header to move to another one.
First visit
The first time you open the page you see a short notice about firewall management: an opened port can expose your server to the internet, a wrong rule can cut off access to your services, and you are responsible for changes made from the panel. Management opens after you accept it; the acceptance is asked once for your account. If you are not experienced with firewall management, you can leave the change to us with a support ticket.
What the page shows
The header has the Shared VPN file button, the Power menu and the Refresh button. The cards below show your public IP addresses (with the Buy an extra IP button), your internal network and your VPN network. Sections are split into tabs; next to each tab name are its technical name (DNAT, SNAT, OpenVPN) and the number of entries; on narrow screens the technical name appears when you hover over the tab.
- Port forwarding: rules that pass connections from the internet to servers in your internal network. Adding, editing, copying and ordering rules, bulk changes and CSV are here.
- NAT loopback: lets servers in your internal network reach port forwarding rules by public IP address or domain name.
- Outgoing IP: which IP address the servers in your internal network use to go out to the internet.
- VPN: users who can connect to your internal network over VPN, their connection status and VPN files.
- Traffic and status: the firewall's current state and traffic graphs.
- Blocked: connections to your open ports, stopped attempts and the IP block list.
- Recent changes: changes made from the panel, with their dates.
When you hover over (or tap, on a phone) the ⓘ icon in column headers and at the start of rows, an explanation opens: at the top, what the rule does in a plain sentence; below it, the technical details.
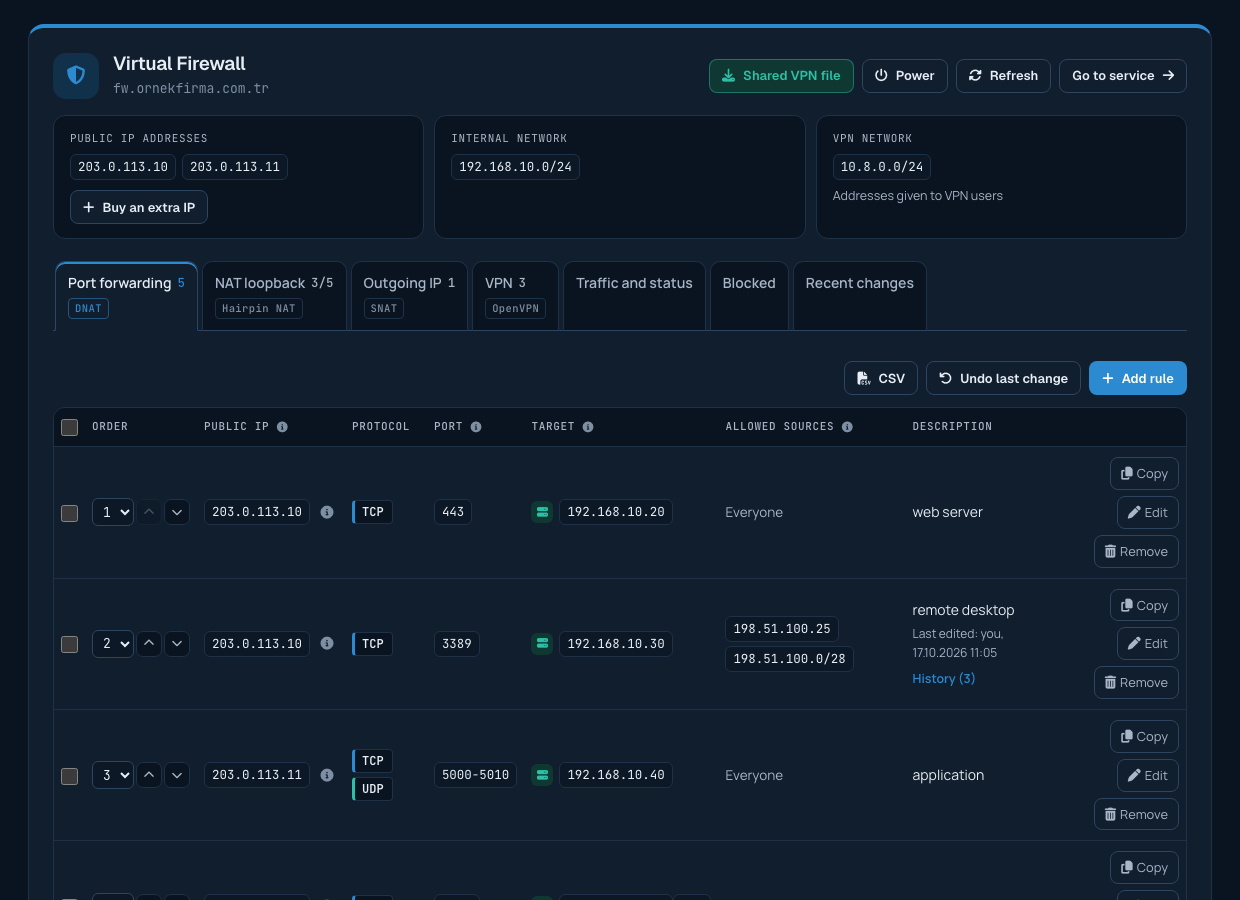
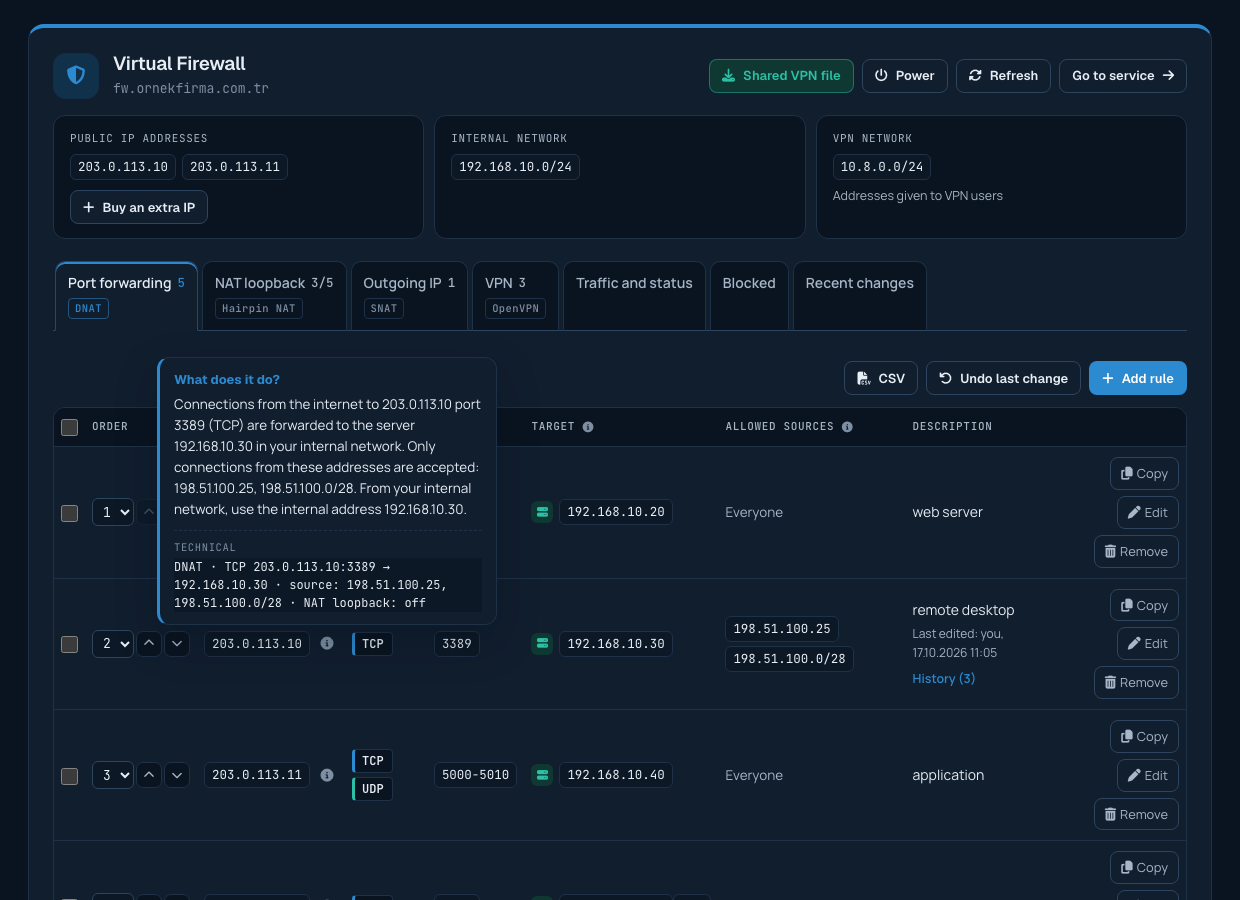
Port forwarding
Port forwarding passes a connection arriving at a port of your public IP address to a server in your internal network. For example, you can forward requests arriving at port 443 of your public IP to your web server to publish your website.
Adding a rule
Click Add rule. If you like, first choose from the Service list (HTTPS, remote desktop, SSH, email, databases…); the protocol and port are filled in. Then enter the public IP, the target IP and, if needed, a different port on the internal server, and choose Everyone or Only certain addresses under Who can connect. The summary line at the bottom of the form shows the rule in one sentence. When you click Add rule, the rule is applied to your firewall and verified; this may take up to half a minute.
With "Everyone" selected, anyone on the internet can reach the port. When you open a sensitive port (remote desktop, SSH, databases) to everyone, a warning appears in the form; to save, tick the "I understand the risk" box below it. We recommend limiting ports such as remote desktop (3389), SSH (22) and databases (1433, 3306, 5432) to the IP addresses you use. You are responsible for the security of the ports you open.
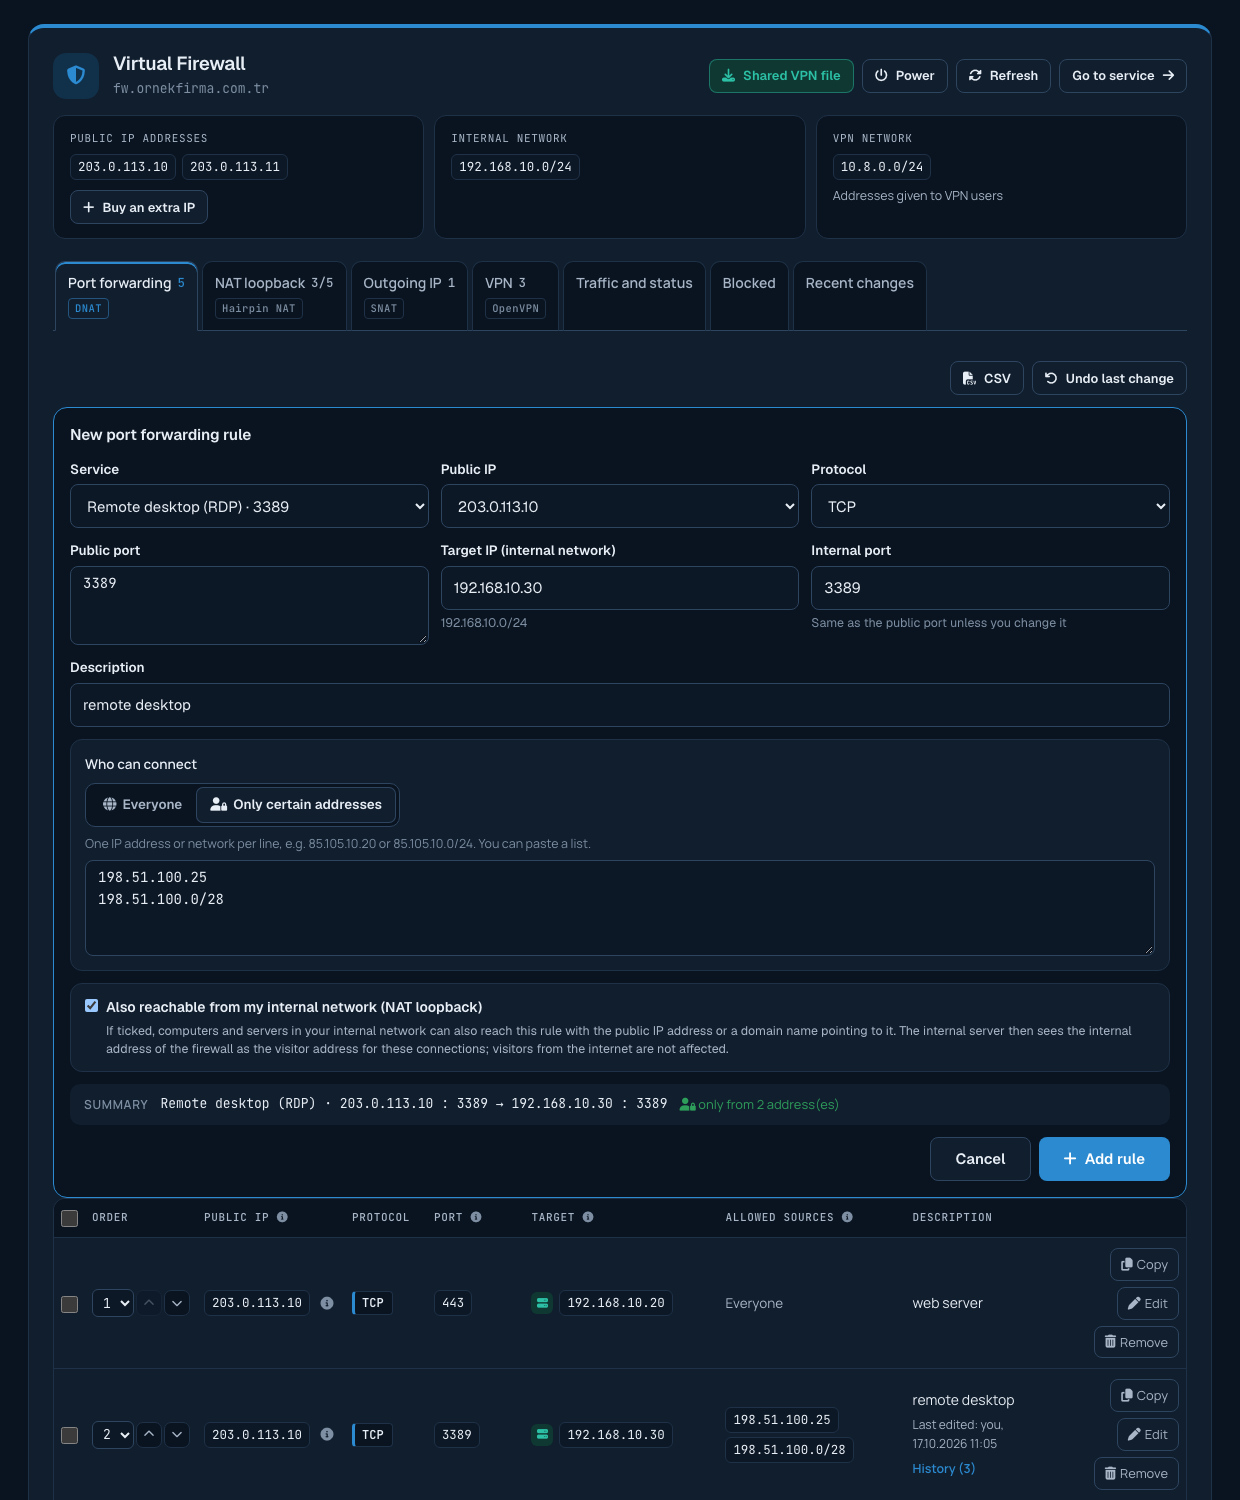
Managing rules
- Edit: changes a rule without deleting it; the form opens with the rule's current values.
- Copy: opens a new rule form filled with all values of the rule; just change the port or the public IP.
- Order: choose the rule's new position from the list, or move it one step with the arrows. Rules are checked from top to bottom.
- Remove: deletes the rule; connections to that port are no longer forwarded.
- Bulk changes: select rules with the checkboxes at the start of the rows to remove, disable or enable them together, add or remove allowed addresses and change NAT loopback.
- CSV: export your rules to a file that opens in Excel, or add rules in bulk from a CSV file with a preview.
Rules our team defined for you show Created by the support team on their row; you can manage them like your own rules. Changed rules show who made the change and when, and the History link shows the rule's latest changes.
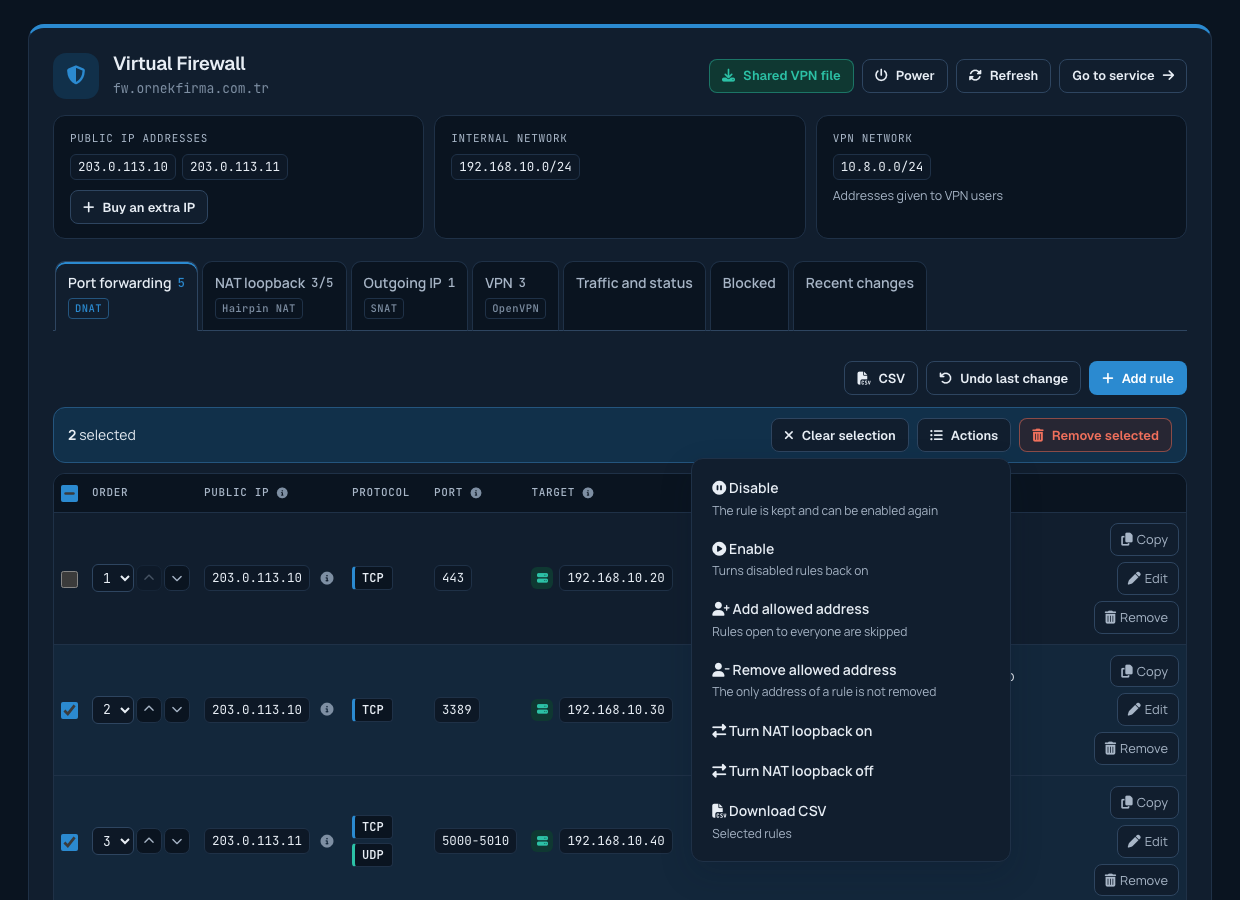
Access from your internal network (NAT loopback)
When a server in your internal network connects to the public IP address of a port forwarding rule (or to a domain name pointing to it), the connection normally fails. With NAT loopback on, these connections are also passed through the firewall and reach the internal server. It is on by default for new rules; on the NAT loopback tab you can turn it on or off for each rule or for all of them at once.
Outgoing IP (source NAT)
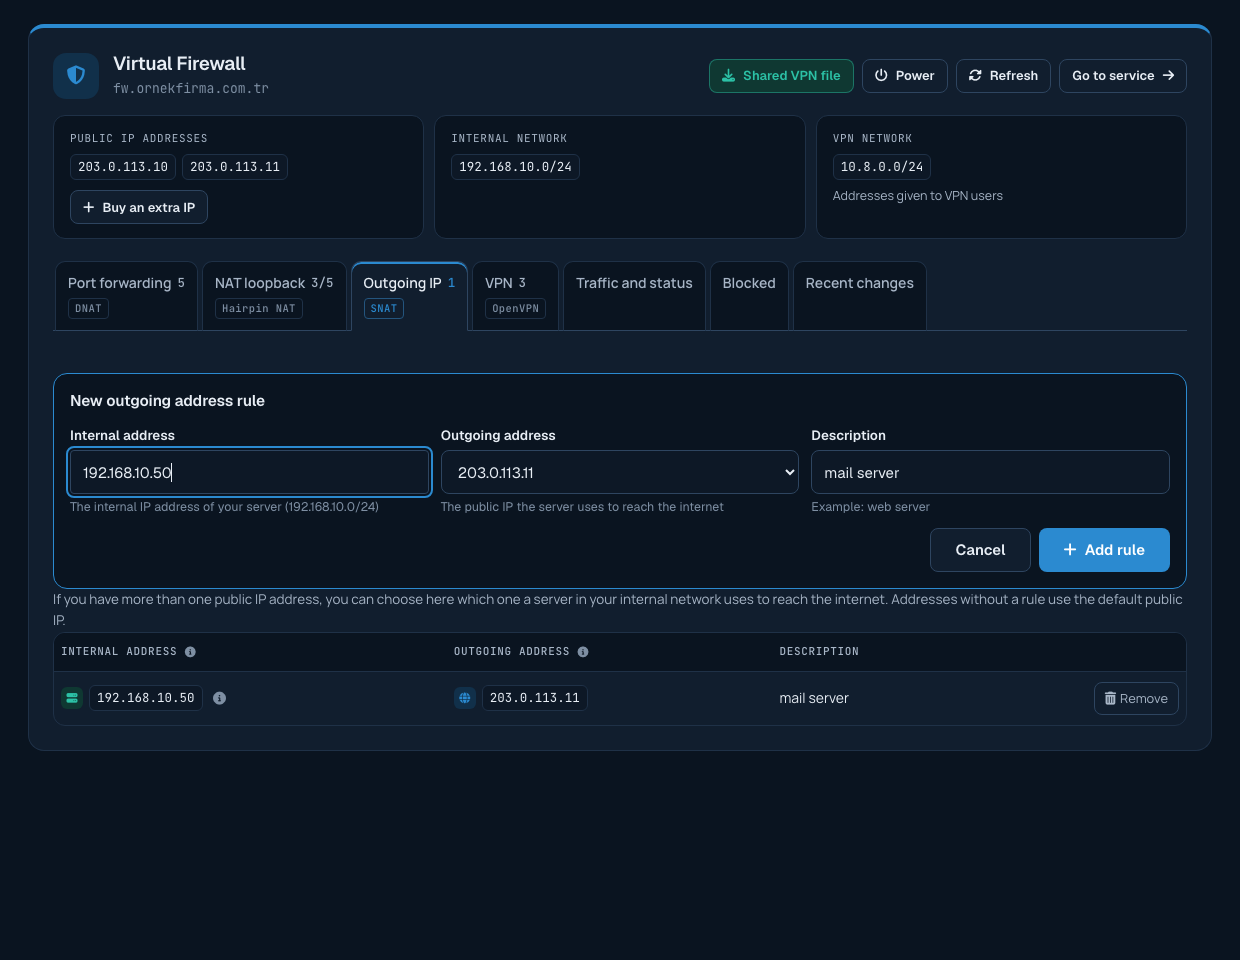
Servers in your internal network go out to the internet with your default public IP address. If you have more than one public IP address, you can choose which one a server uses on the Outgoing IP tab; for example, you can let your mail server go out with its own IP address.
VPN
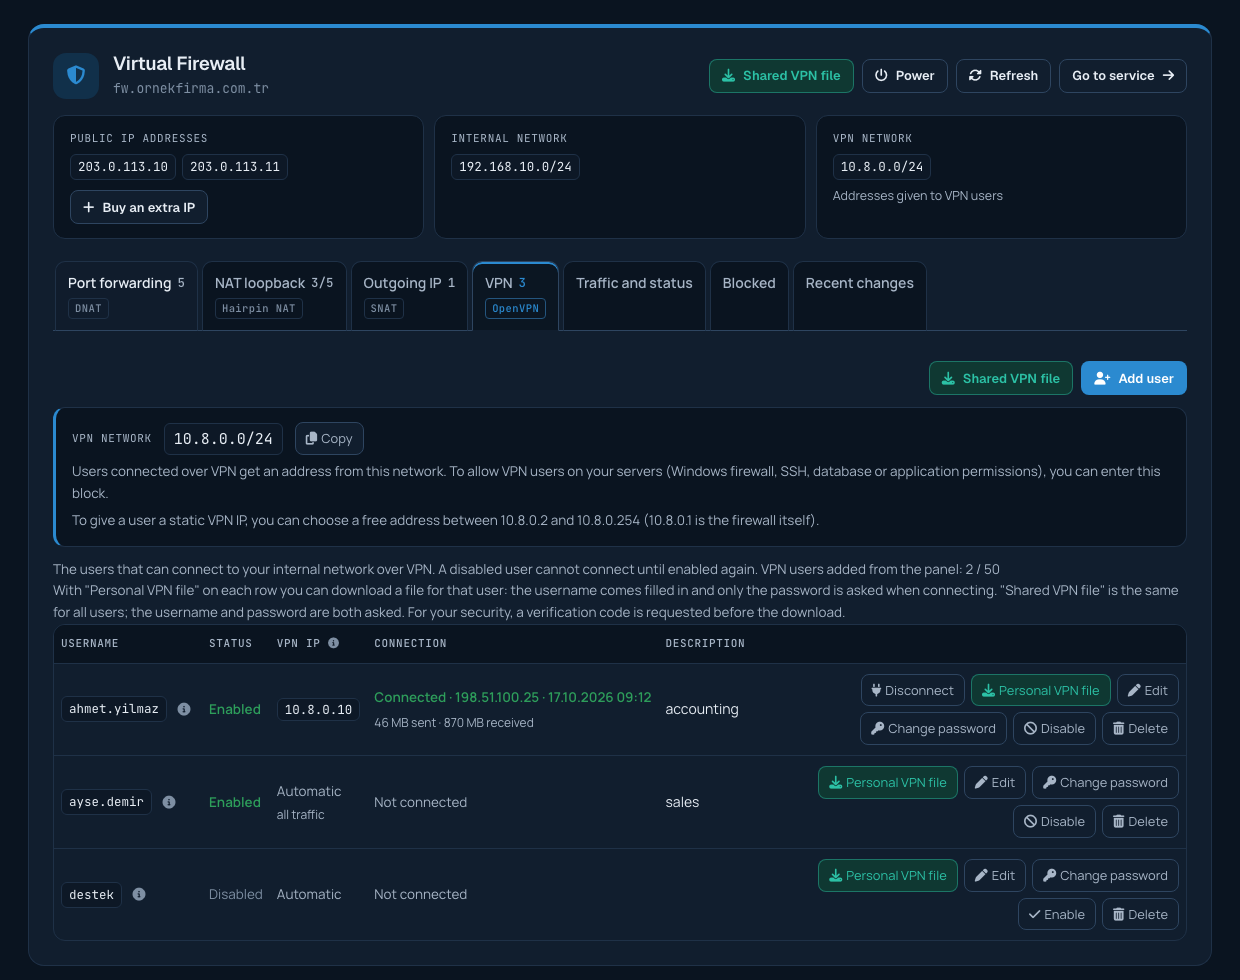
On the VPN tab you can add users who may connect to your internal network, change their passwords, disable, enable and delete them. You can give each user a static VPN IP address and disconnect a connected user. The VPN network box at the top of the tab shows the address block you can enter on your internal servers to allow VPN users.
To connect, you can download two kinds of configuration file: the Personal VPN file on a user's row (the username is filled in, only the password is asked) and the Shared VPN file (the same for all users; the username and password are asked). For your security, a verification code sent to your phone (or, if there is no phone, your email address) is requested before the download.
Traffic, status and blocked connections
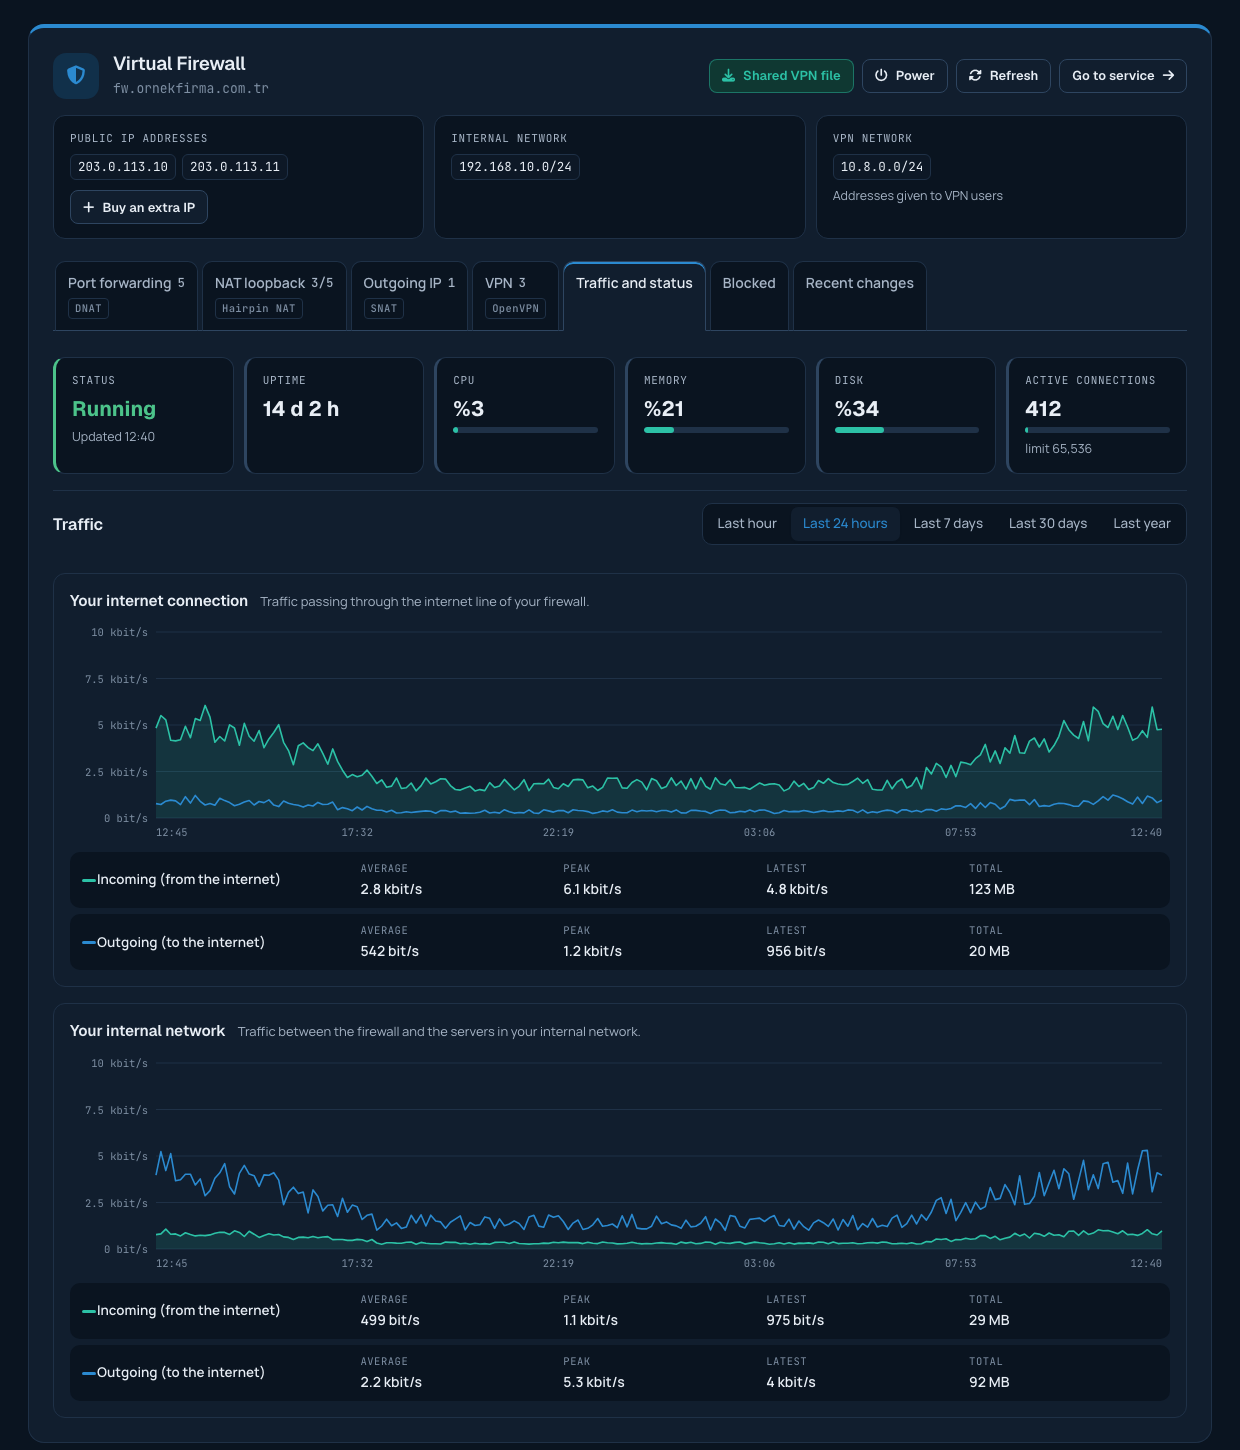
On the Traffic and status tab you can see whether the firewall is running, its uptime, CPU usage, the number of active connections, and graphs of internet and internal network traffic (from the last hour to the last year).
The Blocked tab shows who connected to your open ports today (with the result of VPN logins) and the attempts stopped on closed ports. You can block an unknown address from here and add addresses or networks to the IP block list yourself.
Restarting, shutting down and powering on
With the Power menu in the header you can restart or shut down your firewall cleanly, or power it on if it is off. If the firewall is not responding, you can use Reset and Force power off. Meanwhile your servers lose their internet connection; you are asked to confirm each action.

Extra IP address
With the Buy an extra IP button on the public IP card you can get an extra IP address for your firewall. Your request reaches our team; when the IP address is assigned, you are notified by email and the address can be used in your rules.
How are changes protected?
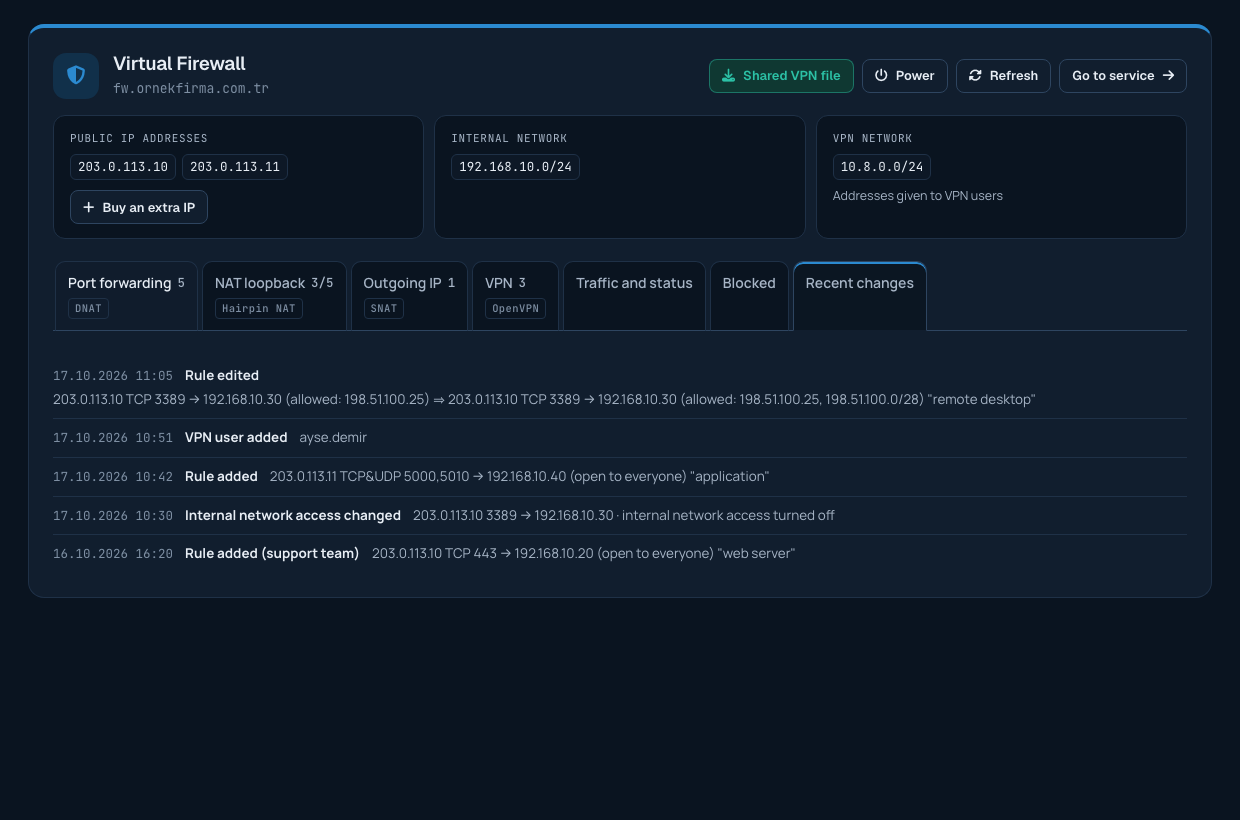
Every change to port forwarding and outgoing rules is verified after it is applied. A change that cannot be verified does not stay; your firewall returns to its previous state by itself. The Undo last change button reverses the last port forwarding change in the past 24 hours (adding, removing, editing, order, bulk changes and rules added from CSV). All actions are recorded and listed on the Recent changes tab.
Rules that cannot be added
- A public IP address that is not assigned to your firewall cannot be used.
- The target IP cannot be outside your internal network.
- On the same public IP address, a port used by another rule cannot be forwarded again.
- Ports reserved for managing the firewall itself cannot be forwarded.
- The number of rules you can add from the panel is limited; the tab shows it when only a few are left. To raise the limit, you can open a support ticket.
User permissions
If you have added extra users to your account, viewing the rules requires the "view services" permission and changing them requires the "manage services" permission. The account owner can grant permissions on the Account -> Users page.
What cannot be done from the panel
For other firewall settings, you can open a support ticket.
Detailed articles
Each topic is explained separately in the knowledge base:
- Virtual Firewall: Adding and Editing Port Forwarding Rules
- Virtual Firewall: Opening a Port Only to Certain IP Addresses
- Virtual Firewall: Bulk Changes and Moving Rules with CSV
- Virtual Firewall: Choosing the Outgoing IP Address of a Server
- Virtual Firewall: Access from Your Internal Network (NAT Loopback)
- Virtual Firewall: Adding VPN Users, Passwords and Static IPs
- Virtual Firewall: Connecting to the VPN (Windows, macOS, iOS, Android, Linux)
- Virtual Firewall: Traffic, Status and Blocked Connections
- Virtual Firewall: Restarting, Shutting Down and Powering On
- Virtual Firewall: Getting an Extra IP Address
- Virtual Firewall: Change Verification, Undo and Change History